SoftChalk Sakai Integration Guide
- Carol SoftChalk
Analytics

SoftChalk™
Sakai Integration Guide
Updated May 24, 2010
Contents
Introduction
Types of Packaging Formats
Collect Scores from Your Students
Publish Method
In SoftChalk: Enter the Server Information
In SoftChalk: Publish a Lesson
View a Published Lesson
In SoftChalk: Replace a Lesson
In SoftChalk: Download a Lesson from the Server
In SoftChalk: Open a Lesson from the Server to Edit It
In Sakai: Rename a Lesson Shortcut
In Sakai: Remove a Lesson and a Lesson Shortcut
Students Accessing Your Lesson
WebDAV Method
Set Up the WebDAV Client
Copy a SoftChalk Lesson Folder into the Client Folder
Create a Link to the SoftChalk Lesson
In Sakai: Change the Name of the Link
Sakai Administrator
Install lbgateway
Troubleshooting
Test the Installation
Help
Copyright Information
h1. Introduction
This guide will cover how to upload your SoftChalk lessons into the Sakai learning management system. (If you are a Sakai administrator, please see the section Sakai Administrator.)
If you don't have SoftChalk already, you can download a free trial version at: http://www.softchalk.c om/l b_trial.html. This is a fully functional version. Once you purchase SoftChalk, you can enter your license information and continue working without having to re-install SoftChalk.
Types of Packaging Formats
This guide will cover the steps for publishing and uploading your lesson in a standard zip format. There are two ways to do upload your lesson:
- A shortcut way using the Publish Lesson feature within SoftChalk (see the section Publish Method)
- WebDAV way – creating a WebDAV network folder on your computer (see the section WebDAV Method)
Collect Scores from Your Students
SoftChalk supports the formatting of lessons in a SCORM 1.2 format and a SCORM 2004 format. SCORM is a format that allows for collecting scores. If your Sakai learning management system supports one of those SCORM formats, then you may be able to upload your lesson as SCORM and have the grades appear in the SCORM Reports area of your Sakai system. For additional information about whether your Sakai system supports SCORM, we suggest you contact your Sakai system administrator.
IMPORTANT: There are other ways to collect scores from your students other than SCORM.
- SoftChalk has a ScoreTracker system that allows the collecting of scores in a format that can be downloaded and opened in a spreadsheet program like Excel. SoftChalk allows you to create a free account in our ScoreTracker system. The ScoreTracker allows you to download student scores from a lesson or a course. For details, see the SoftChalk User Guide (within SoftChalk, choose Help/Help Topics/User Guide). Search on ScoreTracker for details.
- You can have scores emailed to you. For details, search in the User Guide on Lesson Reporting.
- Your students can print certificates. For details, search in the User Guide on Lesson Reporting.
Publish Method
In SoftChalk: Enter the Server Information
IMPORTANT: Your Sakai administrator must configure your Sakai server to support this method of publishing SoftChalk lessons to Sakai.
(If you have trouble publishing your SoftChalk lessons to Sakai using the following instructions, please contact your Sakai administrator to make sure your Sakai server has been configured. Tell your Sakai administrator to see the section in this guide Sakai Administrator.)
You only have to enter the server information once for each computer you use.
- Start SoftChalk. Choose File/Publish Lesson.
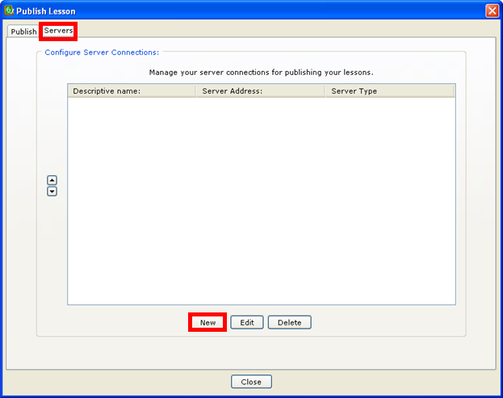
- If you haven't entered any server information, then the window should open to the Servers tab. (If you don't see the Servers tab, then click the Servers tab at the top of your window.) Click New (see below).
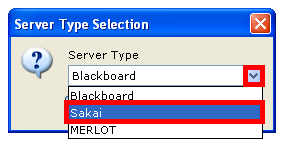
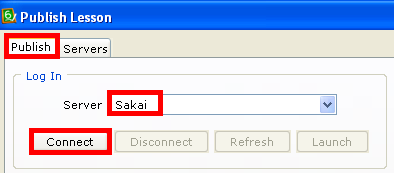
- From the dropdown menu for the server type, select Sakai (see below). Click OK.
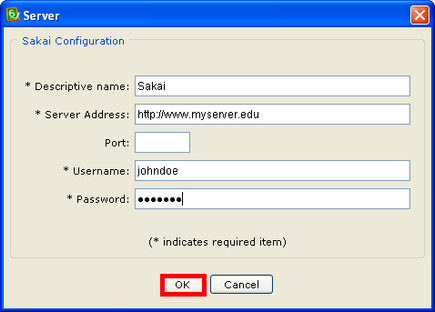
- Enter a Descriptive name such as Sakai.
- For your Sakai Server address, enter the web address you use to log into your Sakai server (see below). (The www.myserver.edu shown below is just an example.) Enter your Username (user id in Sakai) and Password for your Sakai account. Click OK.
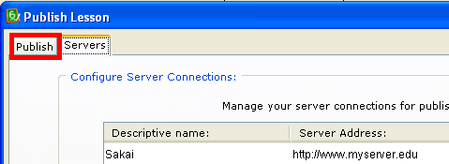
- Click the Publish tab to begin the publish process (see below). Follow the steps in the next section for publishing a standard zip file.
In SoftChalk: Publish a Lesson
- Start SoftChalk if it is not already open. Open a lesson you want to publish (File/Open Recent or File/Open) or start a new lesson (File/New) and save this lesson.
- If your publish window is not already open, choose File/Publish Lesson. The Publish tab at the top should be selected if you have entered server information. (If you have NOT entered server information, see the previous section In SoftChalk: Enter the Server Information.)
- If you have more than one server, you may need to select your server from the dropdown menu at the top. Then click Connect (see below).
IMPORTANT: If you cannot connect to your Sakai server, make sure you are connected to the Internet. (Also double-check your information under the Server tab. You may need to enter a Port number.) If you are connected to the Internet and still cannot connect, then contact your Sakai administrator to make sure your server is configured for publishing SoftChalk lessons. As mentioned previously, tell your Sakai administrator to see the section in this guide Sakai Administrator.
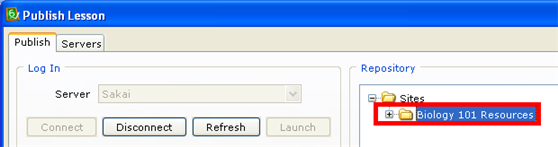
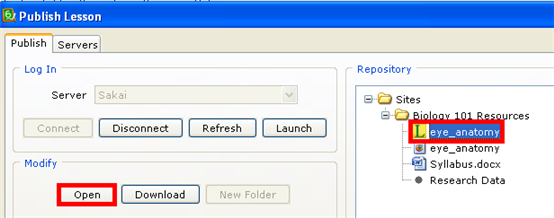
- Once you connect to the server, click the + beside your course Resources folder (see below). You can also double-click on the folder icon or the folder name to expand the list.
- Click on your course Resources folder to select it. Click Publish (see below). IMPORTANT: Depending on your server connection speed, publishing may take a minute or more.
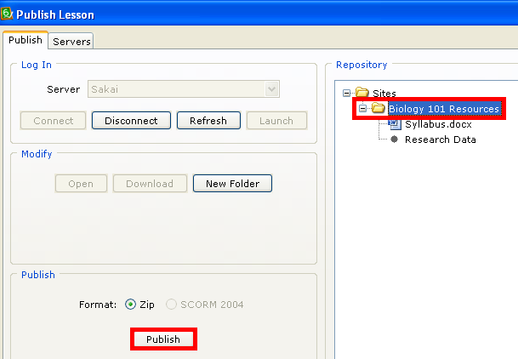
- Click OK at the publish confirmation screen.
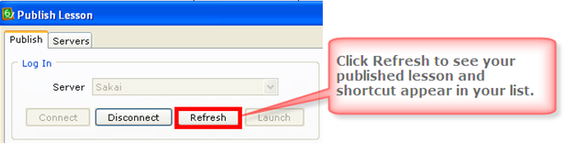
- IMPORTANT: You may need to click Refresh to see your lesson and shortcut appear in your list at the right (see below).
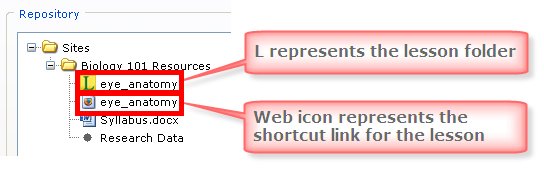
- Once your lesson is published, you will see an L icon representing your lesson folder and a web icon representing the shortcut link to your lesson (see below). The shortcut link has the same name as your lesson. If you'd like, you can change this shortcut name in Sakai (see the section In Sakai: Rename a Lesson Shortcut).
View a Published Lesson
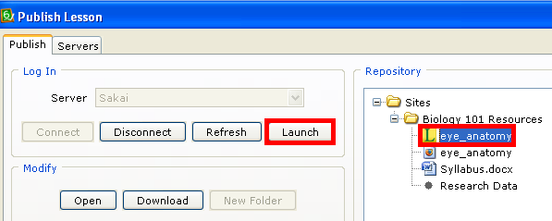
- To view your lesson as it appears in Sakai, you can click on either the L icon (for the lesson folder) or the web icon (for the shortcut). Then click Launch (see below).
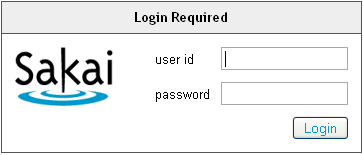
- Your web browser launches. Enter your user id and password and click Login (see below).
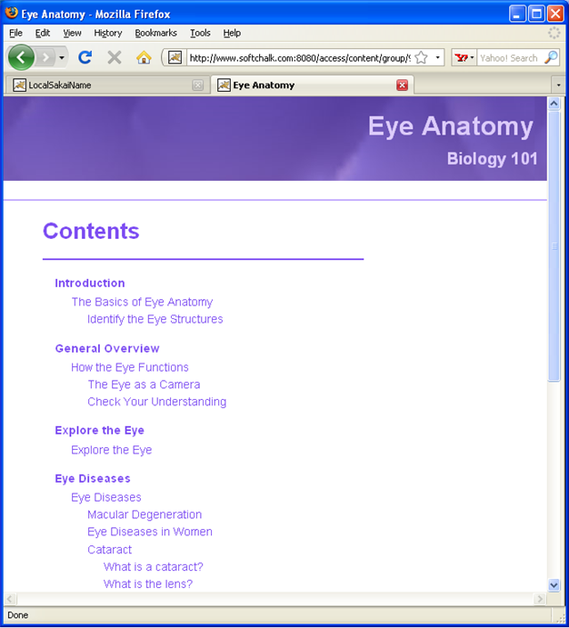
- Your SoftChalk lesson appears in the browser window as your students would see it (see below).
In SoftChalk: Replace a Lesson
[If you want to remove a lesson (rather than replace a lesson), see the section In Sakai: Remove a Lesson and Lesson Shortcut.]
- Start SoftChalk if it is not already open. Open a lesson (Choose File/Open or File/Open Recent.)
- If your publish window is not already open, choose File/Publish Lesson. The Publish tab at the top should be selected if you have entered server information.
- Select your server from the dropdown menu at the top. Then click Connect.
- On the right-hand side of your screen, select your lesson folder represented by the L icon. Click Publish (see below).
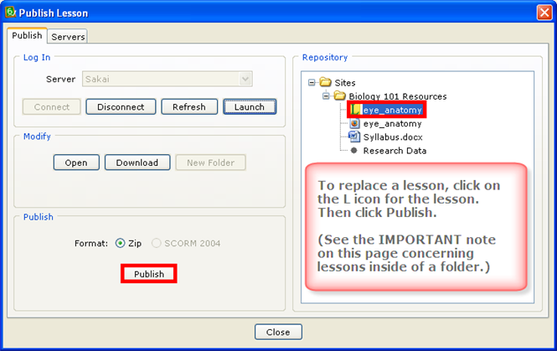
- Click OK at the publish confirmation screen.
- With your lesson selected, click Launch to verify that your lesson was updated.
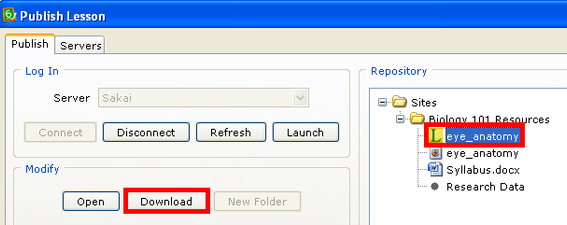
In SoftChalk: Download a Lesson from the Server
Normally, you will make changes in your lesson on your local computer and then replace the lesson as needed on Sakai. (See the previous section In SoftChalk: Replace a Lesson.)
There may be times, however, when you are at a different computer and you want to download your lesson to that computer. See the steps below for downloading a SoftChalk lesson to your computer.
- Start SoftChalk if it is not already open.
- Choose File/Publish Lesson.
- Select your server from the dropdown menu at the top. Then click Connect.
- Select your lesson represented by the L icon and click Download (see below).
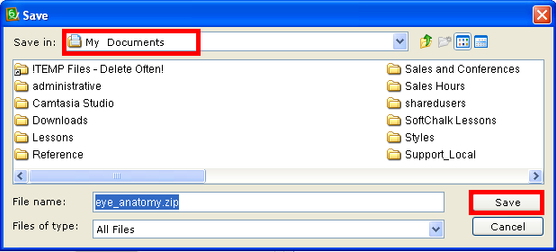
- Navigate to where you want to save your lesson and click Save (see below). Notice that the downloaded file is a .zip file.
- Click OK at the download complete window.
- Click Close to close out of your Publish Lesson window.
- Choose File/Open Packaged Lesson (see below).
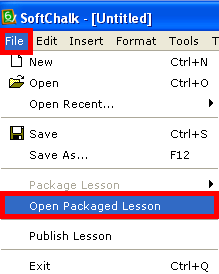
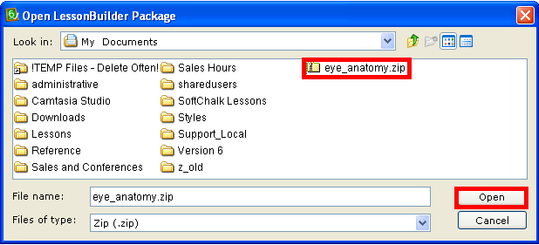
- Navigate to the .zip file you saved earlier. Select it and click Open (see below).
- Your opened lesson should appear. (When you open a packaged lesson, a lesson folder is automatically created in the same folder as your .zip file on your local computer.)
- If you want to make changes and publish your lesson to the server again, see the section In SoftChalk: Replace a Lesson.
In SoftChalk: Open a Lesson from the Server to Edit It
IMPORTANT: Be aware that the steps below allow you to open and edit your lesson on the server. If you have a local lesson on your computer, the changes below will NOT apply to your local lesson. (You can download a lesson from the Sakai server to your local computer and edit the lesson. See the section In SoftChalk: Download a Lesson from the Server.)
- Start SoftChalk if it is not already open.
- If your publish window is not already open, choose File/Publish Lesson. The Publish tab at the top should be selected if you have entered server information.
- Select your server from the dropdown menu at the top. Then click Connect.
- Select your lesson represented by the L icon and click Open (see below).
- Make changes to your lesson and save your lesson. IMPORTANT: Again, be aware that you are saving changes just to be published back into your server. These changes are NOT saved on your local computer.
- Choose File/Publish Lesson.
- Select your server from the dropdown menu at the top. Then click Connect.
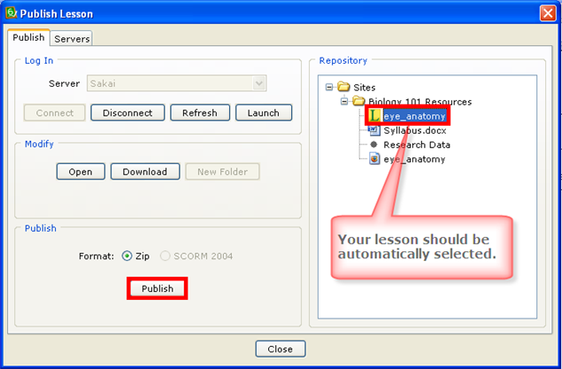
- Notice that your lesson is automatically selected. Click Publish (see below). Your edited changes are now in the lesson on the server. Once again the changes are only in the lesson on the server, NOT in a lesson on your local computer.
- Click OK at the publish confirmation screen.
- With your lesson selected, click Launch to verify that your lesson was updated.
In Sakai: Rename a Lesson Shortcut
You can rename a lesson shortcut within Sakai.
- Log into your Sakai account.
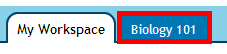
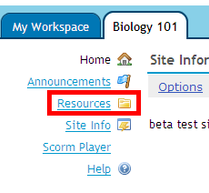
- IMPORTANT: Click the course tab to select your course (see below).
- At the left, click Resources (see below).
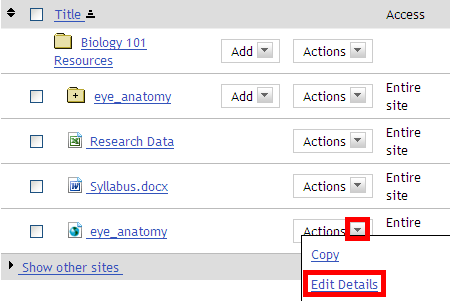
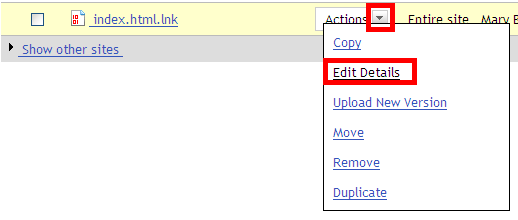
- Click on the Actions dropdown menu beside the shortcut link (web icon) and select Edit Details (see below).
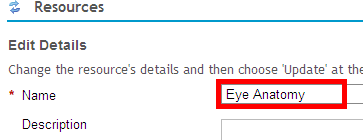
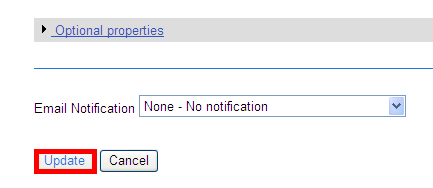
- Type in a different name (see below).
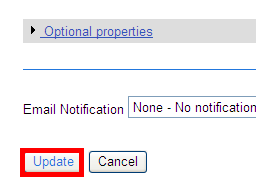
- Scroll down to the bottom of the page and click Update (see below).
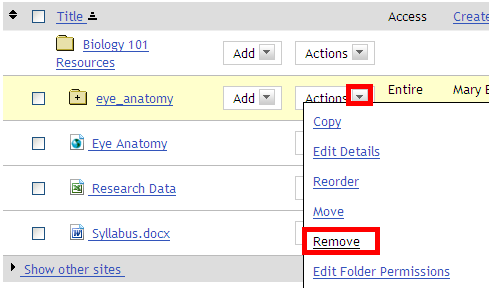
In Sakai: Remove a Lesson and a Lesson Shortcut
You can remove a lesson or lesson shortcut within Sakai. (If you want to replace a lesson rather than remove it, see the section In SoftChalk: Replace a Lesson.)
- Log into your Sakai account.
- IMPORTANT: Click the course tab to select your course (see below).
- At the left, click Resources (see below).
- Click on the Actions dropdown menu beside the item you want to remove and select Remove (see below). Repeat this step to remove the shortcut to your lesson.
Students Accessing Your Lesson
Your students will need to click on the lesson shortcut you created to launch the lesson.
Students can access the SoftChalk lessons using all the major computers and browsers. (See the supported list below.)
- Windows computers with the XP, Vista and Windows 7 operating systems using Internet Explorer or Firefox
- Macintosh computers using Safari or Firefox
WebDAV Method
Before attempting this method, first contact your Sakai administrator to see if you can use the SoftChalk Publish method (see the section Publish Method).
(The WebDAV method to upload your lessons does not require any action on the part of your Sakai administrator.)
Using the WebDAV method, you will create a network folder (client) on your computer into which you can put your SoftChalk lessons for your students.
Set Up the WebDAV Client
- Log into your Sakai account.
- IMPORTANT: Click the course tab to select your course (see below).
- At the left, click Resources (see below).
- Click Upload-Download Multiple Resources (see below).
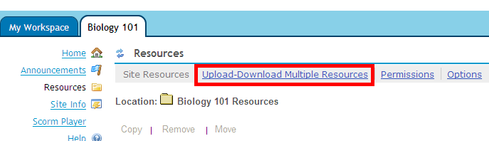
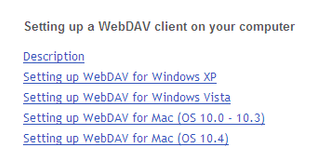
- Click the appropriate link for instructions on setting up a WebDAV client on your computer (see below). Set up the WebDAV client following the appropriate instructions.
Copy a SoftChalk Lesson Folder into the Client Folder
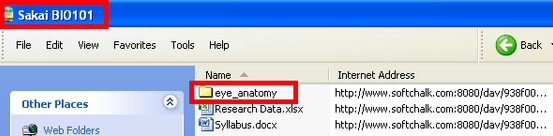
- Once you have set up a WebDAV client on your computer, open the client folder you just created. (On Windows XP, you will find this folder under My Computer/My Network Places.)
- You may need to type a username and password.
- You can copy a SoftChalk lesson folder such as eye_anatomy into this folder (see below).
Create a Link to the SoftChalk Lesson
- You will need to create a link to the index.html file within this folder. Open the lesson folder within your WebDAV client folder and right-click on index.html and choose Create Shortcut (see below).

- Click OK at the message that the shortcut will be placed on your desktop.
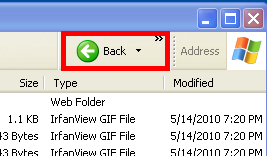
- Go back to the folder where your lesson resides. (Click the Back button - see below.)
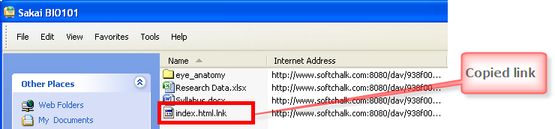
- Copy the shortcut you just created from your desktop into your client folder (see below). Notice that the name changes to index.html.lnk.
In Sakai: Change the Name of the Link
- Log into your Sakai account to change the name of your link.
- After logging in, at the top click the course tab to select your course.
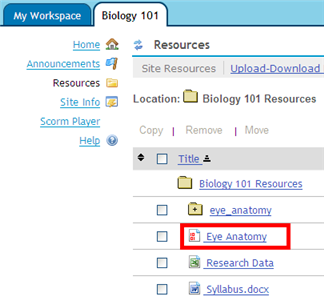
- At the left, click Resources.
- For index.html.lnk under Actions select Edit Details (see below).
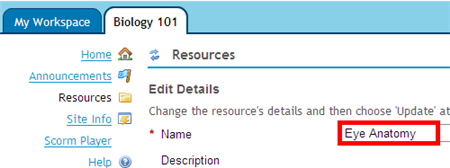
- Under Name, type a different name such as Eye Anatomy (see below).
- Scroll down the window and click Update (see below).
- The updated name (for the link to your lesson) appears in your Resources list (see below).
Sakai Administrator
In order for your faculty to use the SoftChalk Publish feature (see the section Publish Method), you will need to install an application from SoftChalk called lbgateway. Typically this installation takes a few minutes.
IMPORTANT: You must have Sakai version 2.6.x or later to install this application.
The lbgateway application is a servlet that implements a set of REST operations to support bi-directional access to content in Sakai course sites.
Install lbgateway
Use the following script to install lbgateway into your Sakai (2.6.x or later) server.
- In a command shell, CD into your sakai source directory (referred to as sakai/ below).
- Download lbgateway using the following command: svn export *+https://source.sakaiproject.org/contrib/softchalk/tags/lbgateway-15/+* softchalk
- Run cd softchalk
- Run mvn clean install sakai:deploy
The lbgateway application is not a registered Sakai tool. It is a servlet that processes REST requests using Sakai kernel and application services. As such, it requires a separate login to maintain proper security. Operation of this application can be tested (once Tomcat is running again) using the following URL in a browser: http://your-host.edu/lbgateway/help?
A description of the supported REST commands is displayed.
Troubleshooting
Maven Failure
Maven may fail during the build process. Make sure you have installed lbgateway in the correct place (under your sakai-2.6.x or higher directory). Maven errors may indicate other problems.
Gateway Doesn't Respond
If you get no response from the lbgateway/help? request, check the URL to make sure you specified your Sakai server. If that seems correct, check that Tomcat is running.
Test the Installation
To test that all went well with your installation, start SoftChalk and follow the procedures found under the section Publish Method.
If you don't have SoftChalk already, you can download a free trial version at: http://www.softchalk.com/lb_tri al.html. This is a fully functional version. Once you purchase SoftChalk, you can enter your license information and continue working without having to re-install SoftChalk.
Help
If you have problems, questions or comments, please contact us at help@softchalk.com or visit our website at www.softchalk.com
Copyright Information
Copyright ©2002 2003 2004 2005 2006 2007 2008 2009 2010 SoftChalk LLC
All Rights Reserved.