Blackboard and SoftChalk Desktop Integration Guide
- Carol SoftChalk

Blackboard and SoftChalk™ Desktop Integration Guide
Updated February 27, 2020
Contents
Introduction
Explore SoftChalk Cloud
Student Guide to SoftChalk Lessons
Check for SoftChalk Updates
In Blackboard: Edit Mode
Enter the Server Information
In Blackboard: Copy the Access Code
In SoftChalk Create: Paste the Access Code
Scored Lessons
In SoftChalk: Save a ScoreCenter Lesson to Blackboard
In SoftChalk: Edit and Replace a ScoreCenter Lesson
In Blackboard: View or Change Scores for a ScoreCenter Lesson
In Blackboard: Edit the Options for a ScoreCenter Lesson
In Blackboard: Delete a ScoreCenter Lesson
In SoftChalk: Open or Download a ScoreCenter Lesson from Blackboard
Print or Email Scores
Scored Lessons - Package and Upload a SCORM Lesson
In SoftChalk: Package a SCORM Lesson
In Blackboard: Upload the SCORM Zip File
Non-Scored Lessons – Save to Blackboard
In SoftChalk: Save a Lesson to Blackboard
In SoftChalk: Edit and Replace a Lesson
In SoftChalk: Delete a Lesson
In SoftChalk: Open or Download a Lesson from Blackboard
Non-Scored Lessons - Package and Upload a Lesson
In SoftChalk: Package a Lesson
In Blackboard: Upload a Standard Zip File
In Blackboard: View Your Lesson
Revise a Lesson after It Has Been Uploaded into Blackboard
Link to a Discussion Forum within a Lesson
Help
Copyright Information
h1. Introduction
This guide is designed for SoftChalk Desktop users who will upload SoftChalk lessons into Blackboard 9.1 versions. The URL for this guide (Blackboard and SoftChalk Desktop Integration Guide) is below. As we update this guide, the URL will remain the same.
https://softchalk.atlassian.net/wiki/download/attachments/129535122/lms_blackboarddesktop.pdf?api=v2
(If you have a SoftChalk Cloud account, we have a different guide for you; please see the next section Explore SoftChalk Cloud.)
Explore SoftChalk Cloud
If you already have a SoftChalk Cloud account and use Blackboard, please see our Blackboard and SoftChalk Cloud Integration Guide at: https://softchalk.atlassian.net/wiki/download/attachments/121929729/lms_blackboardcloud.pdf?api=v2
If you don't have a SoftChalk Cloud account, please feel free to explore the advantages of a SoftChalk Cloud account with a free 30-day trial at https://www.soft chalkcloud.com.
With a SoftChalk Cloud account, you can:
- Create interactive lessons with SoftChalk Create and save your lessons on your local computer and/or into your SoftChalk Cloud account. By logging into your SoftChalk Cloud account, you can work on your lessons from anywhere.
- Update your lesson once in your SoftChalk Cloud account but link to it in many places. For example, if you are using the same SoftChalk lesson in multiple courses or multiple learning management systems, you can put the link of the lesson from SoftChalk Cloud into your courses. Since the lesson is linked, the update is automatic.
- Have student grades integrate with your Blackboard Results Center. You copy and paste a simple link called an LTI link into Blackboard. (Your Blackboard admin would need to configure your system for the LTI link to work with SoftChalk. This configuration usually takes 15 minutes to complete.)
- Save up to five versions of the same lesson in case you need to go back to a previous version of a lesson.
- Collaborate with other instructors on SoftChalk lessons.
- For more details about using SoftChalk Cloud, please see the SoftChalk Cloud Guide and the previously mentioned Blackboard and SoftChalk Cloud Integration Guide.
Student Guide to SoftChalk Lessons
We encourage you to have your students review our Student Guide to S oftChalk Lessons, which includes a troubleshooting section. The URL for this Student Guide is below. As we update this guide, the URL will remain the same.
[
https://softchalk.atlassian.net/wiki/download/attachments/200114368/studentguide.pdf?api=v2
]Please emphasize the following information to your students, which is covered in the above guide. Check for SoftChalk UpdatesIf you have SoftChalk, you can get an update for the version you have, free of charge. For instance, if you have SoftChalk 8.02.01 you can get a free update to 8.03.08. (If you have difficulty getting an update for your SoftChalk version, you may need to contact a technical support person at your institution who has the access permission to install software and get updates.) In Blackboard: Edit ModeIMPORTANT: As you work through this guide, be sure to have the Edit Mode turned on within your Blackboard course. After you log into Blackboard and select a course, check the upper right corner of your screen to make sure the Edit Mode is on (see below). Enter the Server InformationWith SoftChalk Create, you can save your SoftChalk lesson to Blackboard while you are in SoftChalk. Before you save your lesson to Blackboard, you need to enter your server information within SoftChalk to authenticate your access to Blackboard. In Blackboard: Copy the Access Code
|
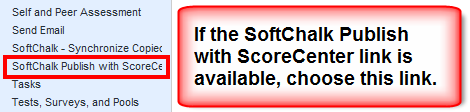
- Click the appropriate link for the version of SoftChalk that you are using (see below). (You may need to scroll down to find it.) If you do NOT see the SoftChalk Publish with ScoreCenter link, please contact your Blackboard administrator to install the SoftChalk Blackboard Building Block mentioned at the beginning of this section.
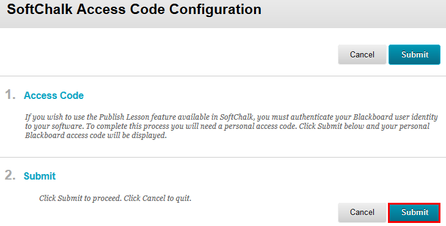
IMPORTANT: If you see the SoftChalk Publish with ScoreCenter link, click on that link.
- Click Submit.
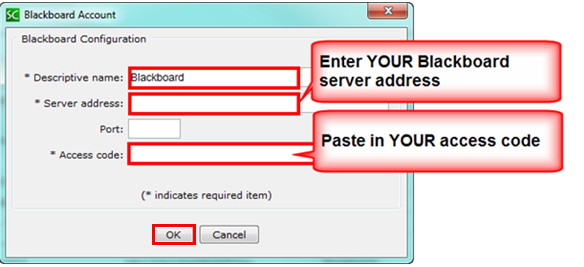
- After you click Submit, you should see a screen like the one below. Copy the access code. Click OK at the bottom right of the screen.
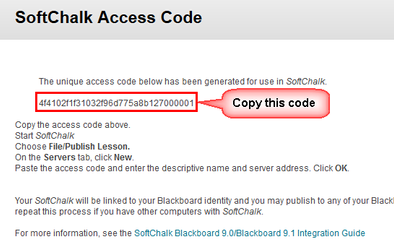
In SoftChalk Create: Paste the Access Code
- Start SoftChalk. Choose File/Manage Publish Accounts.
- If you haven't entered any server information, click New at the bottom of the Publish Accounts window (see below).
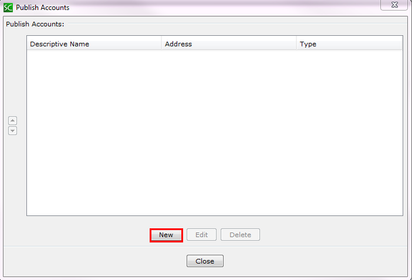
- Select Blackboard under Account Type Selection and then click OK (see below).
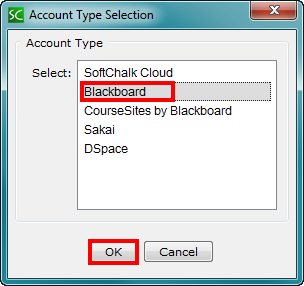
- Enter a descriptive name such as Blackboard (see below). Enter YOUR Blackboard server address. For example, your Blackboard server address would be something like https://yourschool.blackboard.edu. Paste in the access code from Blackboard. Click OK.
- See the sections Scored Lessons and Non-Scored Lessons - Save to Blackboard.
Scored Lessons
As previously mentioned, if you are using a SoftChalk Cloud account, please see our Blackboard and SoftChalk Cloud Integration Guide rather than the steps below.
We recommend using one of the following methods (see the sections In SoftChalk: Save a ScoreCenter Lesson to Blackboard or Print or Email Scores) to collect student scores from your SoftChalk lessons.
In SoftChalk: Save a ScoreCenter Lesson to Blackboard
Saving your lesson to Blackboard in a ScoreCenter format allows you to have your student grades go directly into the Blackboard Results Center. This ScoreCenter format also allows you to: 1) determine which score attempt goes into the gradebook (first, most recent, average or highest) and 2) view detailed scoring information for individual students.
- If you have not already done so, please enter your server information into SoftChalk to authenticate you to your Blackboard server. See the section Enter the Server Information.
- Start SoftChalk if it is not already open. Open a lesson (File/Open) or start a new lesson (File/New) and save this lesson.
- IMPORTANT: Create scored quiz questions and/or activities within your SoftChalk lesson and assign points for each quiz question or activity.
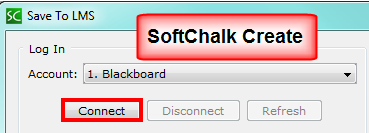
- Choose File/Save to LMS (SoftChalk Create). If you have more than one server, you may need to select your server from the dropdown menu at the top. Then click Connect (see below).
IMPORTANT: If you cannot connect, then you may need to check your access code. See the section Enter the Server Information.
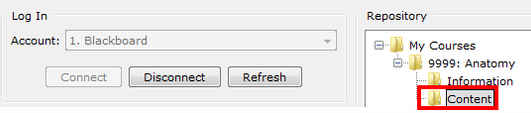
- Once you connect to the server, click the + beside your course to see the folders inside your course (see below). You can also double-click on the folder icon or the name of the course to expand the list.

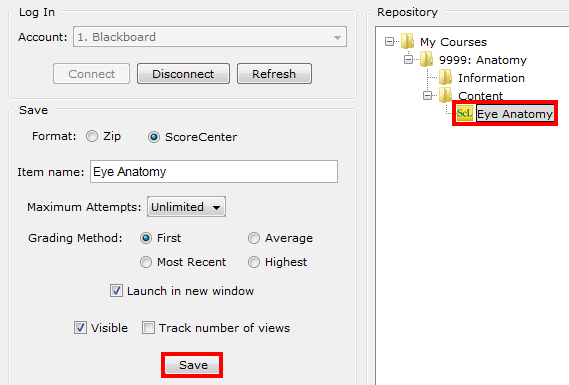
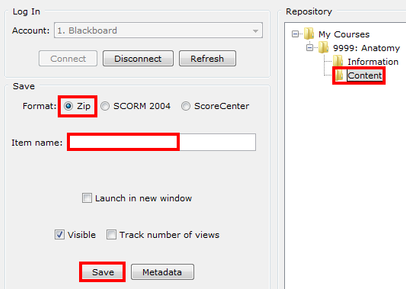
- Click on a folder such as Content for saving your lesson (see below).
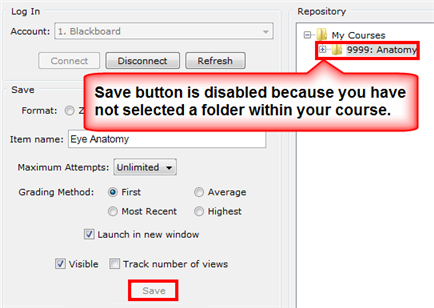
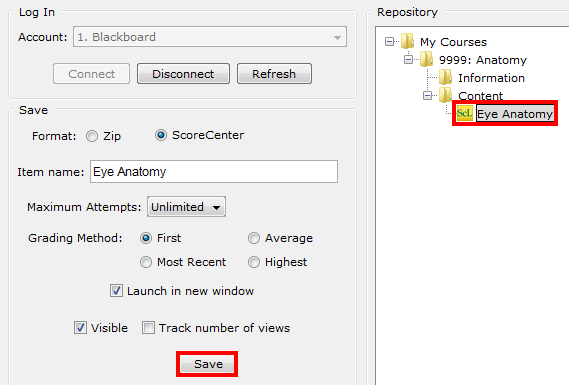
- At the left, select the ScoreCenter option (see below). Enter your item name, select your maximum number of attempts and your grading method. Then click Save (see below). IMPORTANT: If the ScoreCenter option is disabled, then please contact your Blackboard Administrator rather than SoftChalk. (A disabled ScoreCenter option indicates that the latest building block has not been installed or this building block has not been enabled), so the ScoreCenter feature is unavailable.
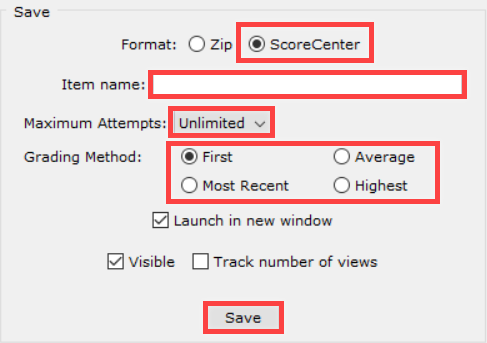
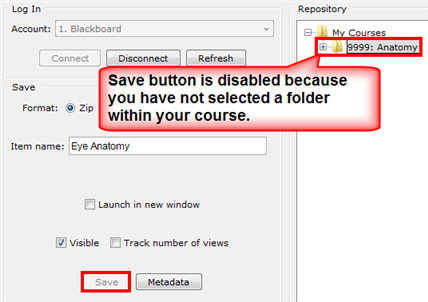
If your Save button is disabled, you have not selected a correct folder (eligible folder) for saving. For instance, you cannot save into a course folder such as Anatomy below, but you can save to the Content folder within the Anatomy course.
Notice the options for collecting scores:
Option |
Description |
Visible |
Determines whether the lesson is visible to the students. |
Maximum Attempts |
Determines how many times the student can access the lesson. |
Scoring Option |
Determines what score is recorded in the Blackboard Results Center. First – first scoreMost Recent – the last scoreAverage – average of all the scoresHighest – highest scoreIf you change your mind what score you want to see, you can make that change within Blackboard. See the section In Blackboard: Edit the Options for a ScoreCenter Lesson. |
- Click OK at the confirmation window saying that your lesson has been saved.
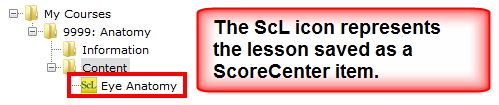
- You should see your newly uploaded lesson (see below). (If necessary, double-click on your Content folder to open it and see your uploaded lesson.) The ScL icon represents a lesson published in the ScoreCenter Format. In Blackboard, your students can now access this lesson under the area you designated such as Content.
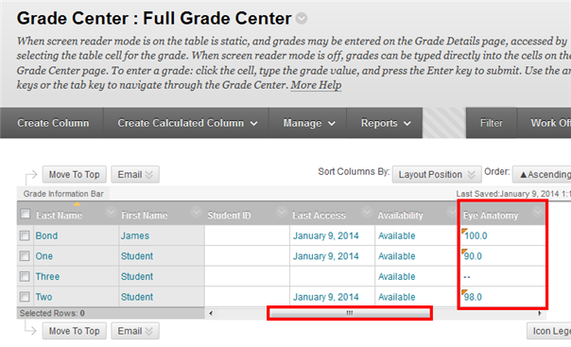
- A column called Eye Anatomy (i.e. the item name you entered) has automatically been created in your Blackboard gradebook. As your students take this ScoreCenter lesson, grades will automatically go into the gradebook. To view your students' attempts, see the section In Blackboard: View or Change Scores for a ScoreCenter Lesson.
In SoftChalk: Edit and Replace a ScoreCenter Lesson
If you have SoftChalk Create, you can make text edits and replace a ScoreCenter lesson that you saved into Blackboard. See the steps below for replacing a lesson. IMPORTANT: We recommend that you only make text changes; if you make point changes for your activities or QuizPoppers, you may run into trouble with inconsistent scores or corrupt grades.
STEPS for SoftChalk Create
- Start SoftChalk if it is not already open. Open the lesson you want to edit (File/Open). Make your text changes and save this lesson.
- Choose File/Save to LMS (SoftChalk Create). If you have more than one server, you may need to select your server from the dropdown menu at the top.
- At the right, select the ScoreCenter lesson you want to replace and click Save (see below).
- You will see a screen suggesting that you only make text changes in your lesson. Click OK.
In Blackboard: View or Change Scores for a ScoreCenter Lesson
- Log into Blackboard and select your course.
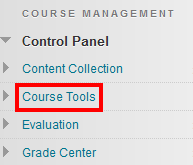
- At the left under the Control Panel, click Results Center. Click Full Results Center.
- Scroll to the right to see the column for your lesson (see below).
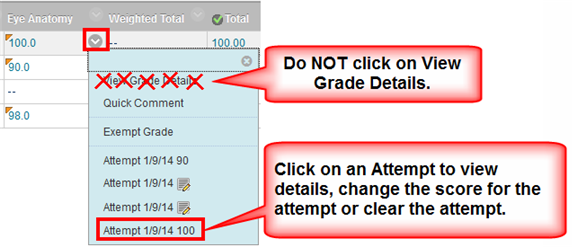
- IMPORTANT: To view the scoring details (or change a score manually), move your cursor over a score and then click the dropdown arrow. Select an attempt to view (see below). Do NOT click on View Grade Details.
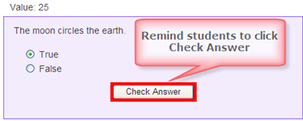
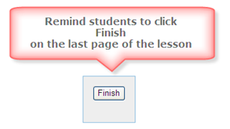
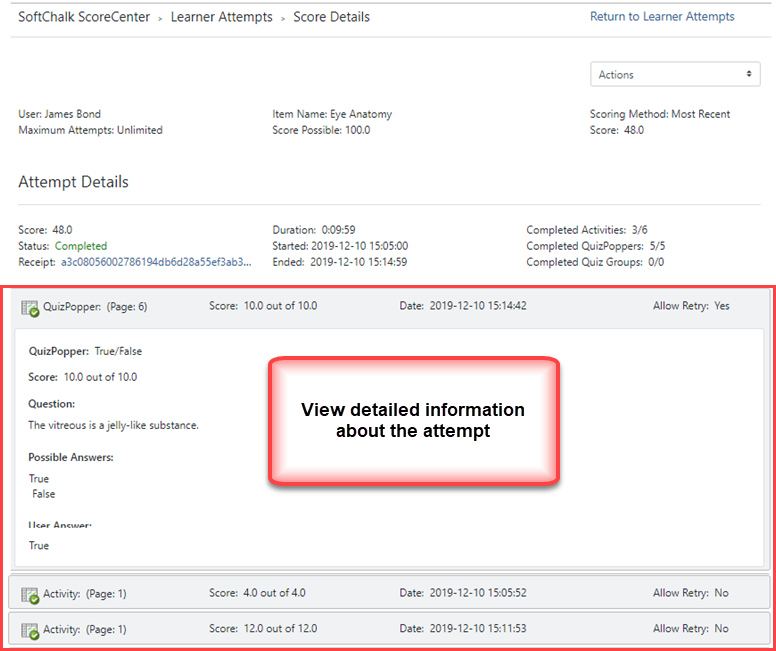
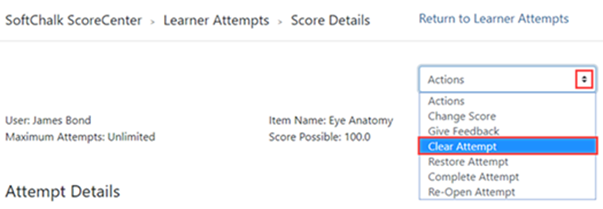
- Make any edits you need within the ScoreCenter Grade Details window (see below). The Complete status indicates that the student clicked the Finish button on the last page of the lesson.
Using the Actions menu dropdown you can:
- Change the Score for the attempt
- Clear the Attempt
- Complete an Attempt - If a student neglects to click the Finish button at the end of the lesson, you can make the attempt complete so that it is calculated in the grading. (For example, your scoring option may be average or highest and completing an attempt may affect the grade for the lesson.)
- Feedback - Type feedback on the lesson that the student will see when viewing the grade for the lesson
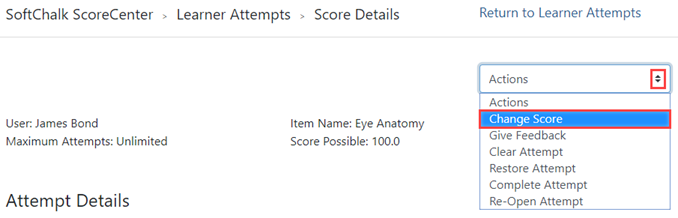
- If you need to change the score for an attempt, use the Actions menu to select Change Score from the dropdown.
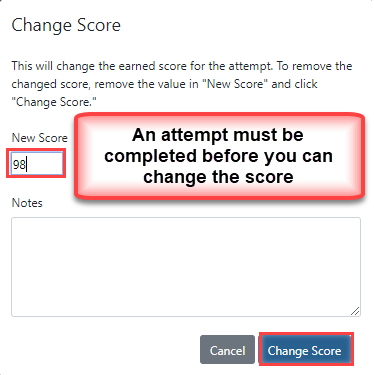
- Enter a new score and click Change Score (see below). IMPORTANT: An attempt has to be complete before you can change the score.
- Notice that you also have the option to Clear an attempt (see below). If you clear an attempt, it will not count as part of the grade calculation. If needed, you can also Restore the attempt.
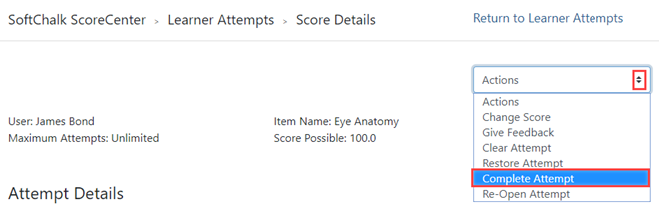
- Notice that you also have the option to Complete an attempt (see below). If a student starts a lesson but neglects to click the Finish button at the end of the lesson, then that attempt is incomplete. An incomplete attempt does not count as part of the grade calculation. You can cause the attempt to be completed so that the score for the attempt is part of the grade calculation.
Be sure to click Complete Attempt.
Essays
If you use essays in your lesson, you can view the essays within the ScoreCenter area (see the previous section In Blackboard: View or Change Scores for a ScoreCenter Lesson). Please note the following important information.
IMPORTANT: Please note that you may want to change the score for the attempt based on the points that you assigned to an essay. In other words, you'll need to read and evaluate the essay to give the appropriate points. By default, a student receives 0 points for an essay with assigned points even if he or she completes the essay.
- In SoftChalk C reate, In SoftChalk Create, insert an essay (Insert/QuizPopper/Essay) and assign points to the essay. (Assigning points is optional.)
- Remind your students to click Finish for each essay (see below).

You can modify the score for the lesson based on the points you decide to give to the essay. For example, you may have a lesson worth 100 points including one essay worth 10 points. (You assigned the points for the essay and other items.) Let's say a student completes everything correctly, completes the essay, clicks the Finish button for the essay and then clicks the Finish button on the last page of the lesson to submit his or her score. At this stage, the student has a score of 90 out of 100 because you will need to evaluate the essay and assign points. You can go into the gradebook (i.e. ScoreCenter) and evaluate the essay and modify the score. You may want to provide feedback to the student on the essay by clicking the Feedback button within the attempt.
(You may want to explain the above process to your students; as mentioned, you also have the option to assign 0 points to an essay if you like.)
In Blackboard: Edit the Options for a ScoreCenter Lesson
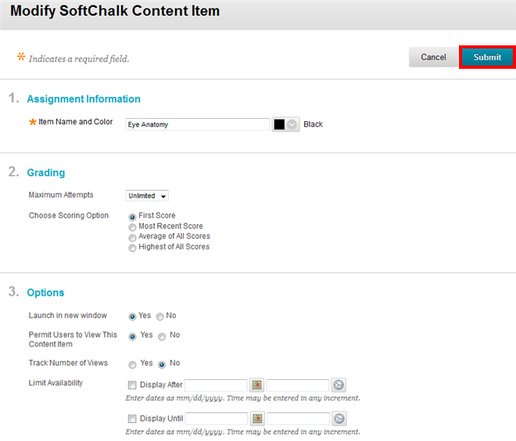
IMPORTANT: You can edit the options for your ScoreCenter lesson even after students start taking the lesson. For instance, you can decide you want the highest score for each student appearing in the Results Center rather than the first score for each student.
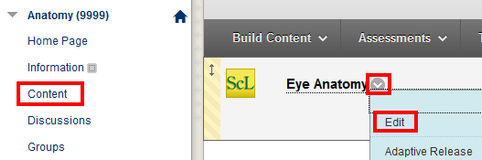
- Log into Blackboard and select your course. Click Content (or whatever area you published your lesson to).
- Click on the down arrow at the end of your lesson name and select Edit (see below).
- Make the changes and click Submit.
In Blackboard: Delete a ScoreCenter Lesson
If you need to delete a ScoreCenter lesson, you will need to do that in Blackboard. Deleting a ScoreCenter lesson in Blackboard does not automatically delete the column for that lesson in the gradebook. Depending on your needs, you may also need to delete the grade column for the lesson in the Blackboard Results Center.
- Log into Blackboard and select your Blackboard course.
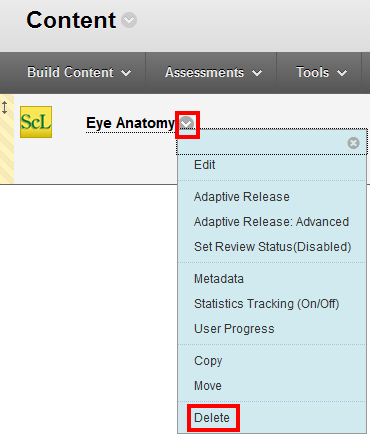
- Click the Content area where your ScoreCenter lesson is located.
- Click the down arrow at the end of your ScoreCenter lesson and select Delete (see below). If you do NOT see the down arrow, be sure to select Edit Mode on. (See the icon in the upper right corner of your screen.)
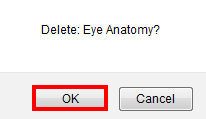
- Click OK (see below).
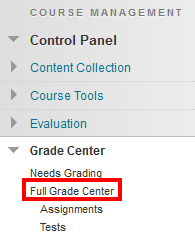
- As mentioned previously, depending on your needs you may want to delete the column for the ScoreCenter lesson in the Blackboard Results Center. If so, in Blackboard at the left under Course Management, select Results Center/Full Results Center (see below).
- Scroll to find the gradebook column that you want to delete. Click the arrow beside the column name and select Delete (see below).
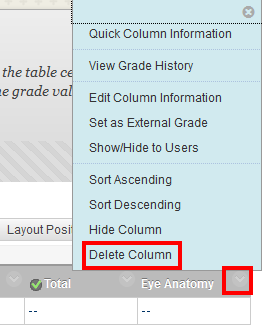
- IMPORTANT: Be sure that you do not have any grades in this column before you click OK. (If you do have grades that you want to save, then copy them somewhere to enter them manually later.)
In SoftChalk: Open or Download a ScoreCenter Lesson from Blackboard
The steps below allow you to open a ScoreCenter lesson to edit or download a ScoreCenter lesson to your local computer for editing.
IMPORTANT: Please be aware that if you choose to open and edit the lesson rather than download it, the changes will NOT apply to any lessons on your local computer. (When you choose Open – see the steps below, the lesson downloads to a temporary folder but that folder is deleted when you close SoftChalk.)
- Start SoftChalk if it is not already open.
- Choose File/Open From LMS (SoftChalk Create).
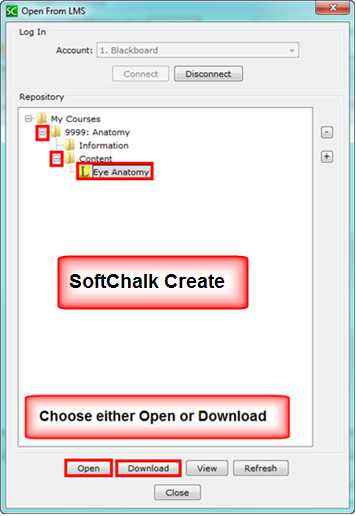
- SoftChalk Create Users - Click the + icons to navigate to your lesson. Click on your lesson. Then click either Open or Download (see below).
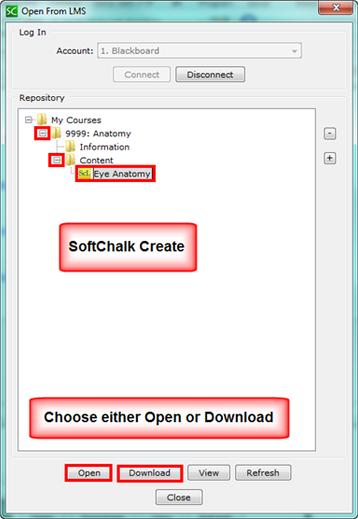
- If you chose Open, be sure when you save your lesson back to Blackboard, that you choose the ScoreCenter format.
- If you chose Download, then click Save to save the .zip file to your local computer (see below).
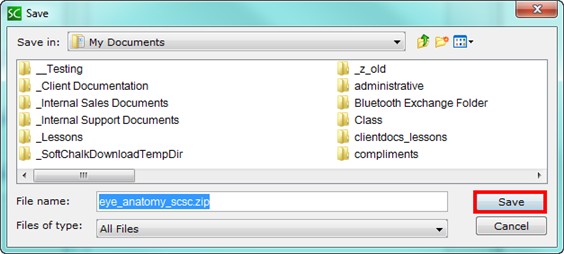
- Within SoftChalk, choose File/Open Packaged Lesson to open this lesson for editing. You can save it back to Blackboard – see the section In SoftChalk: Save a ScoreCenter Lesson to Blackboard. If you already have a lesson folder with the same name (e.g. eye_anatomy) where you are saving the .zip file, please save your .zip file in another location (or move your previous lesson folder). When you choose File/Open Packaged Lesson, a lesson folder is created (e.g. eye_anatomy). If you already have a lesson folder with the same name, you won't be able to use the File/Open Packaged Lesson feature.
Print or Email Scores
Your students can print certificates of their scores and/or your students can email you within the lesson to send their scores.
With the email option, you will get an email from each student for each attempt the student made for the lesson. If you can use the ScoreCenter format option (see the section In SoftChalk: Save a ScoreCenter Lesson to Blackboard), you may want to use that option instead so you won't have to manage individual emails.
If you still want to have students print certificates or send emails to you, please see the steps below:
- Create scored quiz questions and/or activities within your SoftChalk lesson and assign points for each quiz question or activity.
- Add the email feature within your SoftChalk lesson. For SoftChalk Create, choose Properties/Lesson Certificates.
- Make the appropriate selections under Properties/Lesson Certificates.
- On the last page of your lesson within the web browser (e.g. Chrome, Internet Explorer, Firefox or Safari), is an area for students to type their name or identifier and then click Email Score, Print Certificate and/or Print Score Summary. (You can preview your lesson on your local computer to see how this works.)
- For more details, please search on Options for Tracking Scores within the SoftChalk Create Guide.
- You can upload your lesson to Blackboard in one of two ways:
- Within SoftChalk saving it to Blackboard (see the section Non-Scored Lessons – Save to Blackboard) OR
- Uploading and unzipping a packaged lesson (see the section Non-Scored Lessons – Package and Upload a Lesson).
Scored Lessons - Package and Upload a SCORM Lesson
As mentioned previously, if you have a SoftChalk Cloud account, please see our Blackboard and SoftChalk Cloud Integration Guide rather than using the steps below.
In SoftChalk: Package a SCORM Lesson
- Start SoftChalk if it is not already open. Open a lesson (File/Open) or start a new lesson (File/New) and save this lesson.
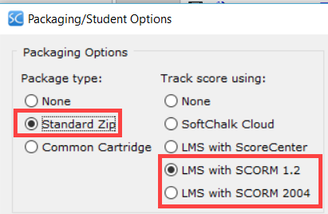
- Within your lesson, choose File/Package Lesson. Under Package type, choose Standard Zip. Under Track score using choose LMS with SCORM 1.2 OR LMS with SCORM 2004 (see below).
- Select the area where you want the zip file saved such as your Desktop. Then click
OK. By default, you would save to your Documents area.
- Your packaged file has your lesson name with a _sco.zip extension for SCORM 1.2 lessons and _sco2004.zip for SCORM 2004 lessons (see below). If
your file extensions are not showing, you will not see the .zip at the end of the
filename. Look for a folder with a zipper or package icon with your lesson name.
In Blackboard: Upload the SCORM Zip File
- Log into your Blackboard account. Select your course from the My Courses list
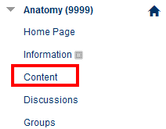
- On the left sidebar, select Content.
- Click Build Content and select Content Package (SCORM) (see below).

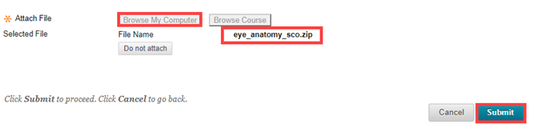
- Click the Browse My Computer button to locate the SCORM package file (.zip), Open and click the Submit button
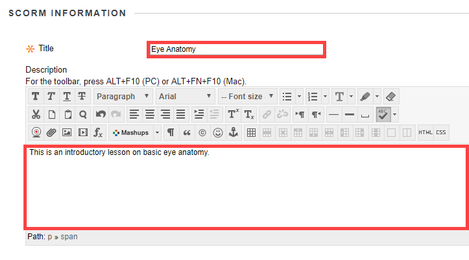
- Give the Content Item a name and optionally set a description
- Set the Make SCORM Available Option to Yes
- Set Number of Attempts
- Enter Points Possible
- Set the Grading SCORM to SCORM Completion

- Click the Submit button
Non-Scored Lessons – Save to Blackboard
(As previously mentioned, if you are using a SoftChalk Cloud account, please see our Blackboard and SoftChalk Cloud Integration Guide rather than the steps below.)
In SoftChalk: Save a Lesson to Blackboard
- If you have not already done so, please enter your server information into SoftChalk to authenticate you to your Blackboard server. See the section Enter the Server Information.
- Start SoftChalk if it is not already open. Open a lesson (File/Open) or start a new lesson (File/New) and save this lesson.
- Choose File/Save to LMS. If you have more than one server, you may need to select your server from the dropdown menu at the top. Then click Connect (see below).
IMPORTANT: If you cannot connect, then you may need to check your access code. See the section Enter the Server Information.
- Once you connect to the server, click the + beside your course to see the folders inside your course (see below). You can also double-click on the folder icon or the name of the course to expand the list.
- Click on a folder such as Content for saving your lesson (see below).

- At the left, select the Zip format (see below). Enter your Item name. Then click Save (see below).
- Click OK at the confirmation window saying that your lesson has been saved or published.
- If your Save or Publish button is disabled, you have not selected a correct folder (eligible folder) for saving. For instance, you cannot save into a course folder such as Anatomy below, but you can save to the Content folder within the Anatomy course.
- You should see your newly uploaded lesson. (If necessary, double-click on your Content folder to open it and see your uploaded lesson.) Your students can now access this lesson under the area you designated such as Content. SoftChalk has an L icon to represent this lesson (see below).
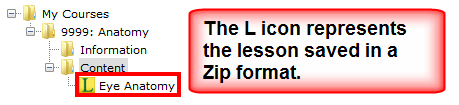
- Your students can now begin taking your lesson by clicking on this icon in Blackboard. (Even though you uploaded your lesson in a zip format, you don't have to unpackage the lesson; all that is done automatically for you.)
In SoftChalk: Edit and Replace a Lesson
You can replace ONLY lessons uploaded in the .zip format. (If you upload a lesson in the ScoreCenter format, see the section Revise a Lesson after It Has Been Uploaded into Blackboard.)
- Start SoftChalk if it is not already open. Open a lesson (Choose File/Open or File/Open Recent.) Edit and save your lesson.
- Choose File/Save to LMS.
- You may already be connected to your server. If not, select your server from the dropdown menu at the top. Then click Connect.
- At the right, select the ScoreCenter lesson you want to replace and click Save (see below).
- At the right, select the ScoreCenter lesson you want to replace and click Save (see below).
- Click OK at the screen saying the item will be replaced.
In SoftChalk: Delete a Lesson
- Start SoftChalk if it is not already open.
- Choose File/Save to LMS.
- You may already be connected to your server. If not, select your server from the dropdown menu at the top. Then click Connect.
- At the right, navigate to select the lesson you want to delete.
- At the left, select the checkbox Allow deleting of items. Then click Delete (see below).
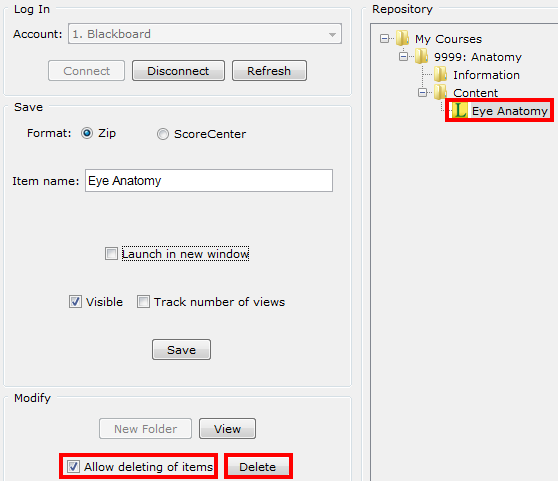
- Click OK at the confirmation window asking if you want to delete the item.
In SoftChalk: Open or Download a Lesson from Blackboard
The steps below allow you to open a lesson to edit or download a lesson to your local computer for editing.
IMPORTANT: Please be aware that if you choose to open and edit the lesson rather than download it, the changes will NOT apply to any lessons on your local computer. (When you choose Open – see the steps below, the lesson downloads to a temporary folder but that folder is deleted when you close SoftChalk.)
- Start SoftChalk if it is not already open.
- Choose File/Open From LMS.
- SoftChalk Create Users - Click the + icons to navigate to your lesson. Click on your lesson. Then click either Open or Download (see below).
- If you chose Download, then click Save to save the .zip file to your local computer (see below).
- Within SoftChalk, choose File/Open Packaged Lesson to open this lesson for editing. You can save it back to Blackboard – see the section In SoftChalk: Save a Lesson to Blackboard. If you already have a lesson folder with the same name (e.g. eye_anatomy) where you are saving the .zip file, please save your .zip file in another location (or move your previous lesson folder). When you choose File/Open Packaged Lesson, a lesson folder is created (e.g. eye_anatomy). If you already have a lesson folder with the same name, you won't be able to use the File/Open Packaged Lesson feature.
Non-Scored Lessons - Package and Upload a Lesson
As mentioned previously, if you have a SoftChalk Cloud account, please see our Black board and SoftChalk Cloud Integration Guide rather than using the steps below.
You may be able to use the save or publish to Blackboard feature which has fewer steps. See the section Non-Scored Lessons - Save to Blackboard.
In SoftChalk: Package a Lesson
- Start SoftChalk if it is not already open. Open a lesson (File/Open) or start a new lesson (File/New) and save this lesson.
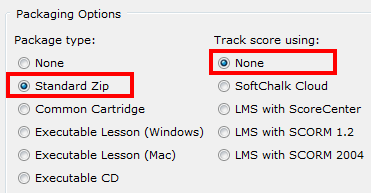
- Within your lesson, choose File/Package Lesson. Under Package type, choose Standard Zip. Under Track score using choose None (see below).
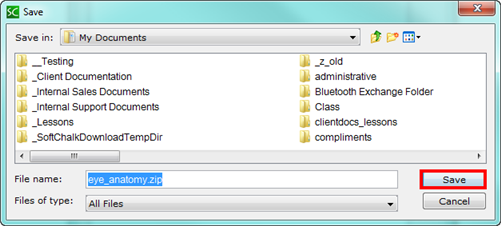
- Your packaged file has your lesson name with a .zip extension. (If your file extensions are not showing, you will not see the .zip at the end of the filename. Look for a folder with a zipper icon with your lesson name.) If you have SoftChalk Create, by default this zip file is in you're My Documents area or wherever you chose to save it. Notice the eye_anatomy.zip file in the image below.

In Blackboard: Upload a Standard Zip File
After packaging your lesson within SoftChalk (see the previous section), then you're ready to upload the lesson zip file into Blackboard.
- Log into your Blackboard account.
- Select the course that you want to add the lesson into.
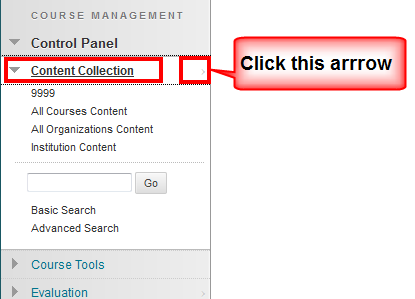
- On the left-hand side under Control Panel click Content Collection. (Content Collection might be a tab on the top of the screen). (Or under Control Panel click Files.) To the right of the word Content Collection (or Files), click the arrow (see below).
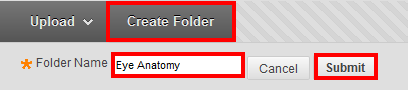
- Click Create Folder (a new folder is needed for every Zip file). Type a folder name and click Submit (see below).
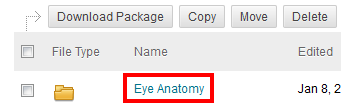
- Locate the folder you just created. (If it does not display, you will need to click Show All at the bottom of the screen or search page by page). Click the folder name to open it (see below).
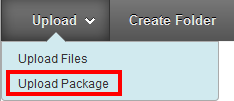
- Click on the Upload dropdown menu and select Upload Package (see below).
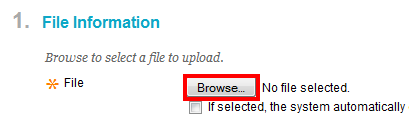
- Under File, click Browse (see below).
- Navigate to your .zip file.
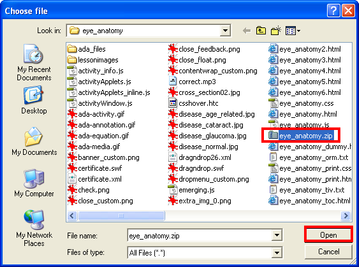
- Leave the File Name Encoding at Default (UTF-8) and click Submit (see below).
![]()
- At the top left select a content area such as Content (see below). In case you don't see the left panel below, click the expand arrow
 at the left of the screen to see the panel.
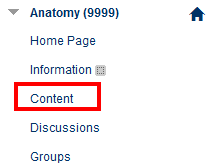
- Click Build Content and select Item (see below).
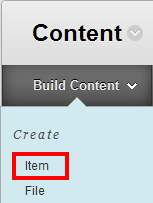
- Enter a Name for the content (see below).
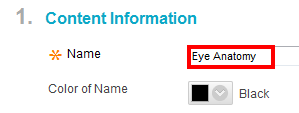
- Under Attachments, click Browse Course (or Browse Files) (see below).
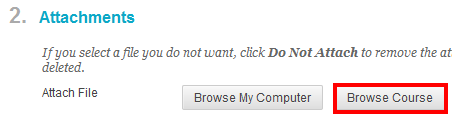
- Click the folder name where you uploaded your .zip file (see below). (Do NOT click on the checkbox beside the folder name.)
- Select the checkbox beside index.html (see below).
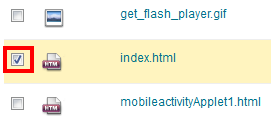
- Scroll down and click Submit.
- If you get a message screen, "Making this selection will give explicit Read permission for this item to: members of this course or organization" click OK.
- Scroll down and click Submit.
In Blackboard: View Your Lesson
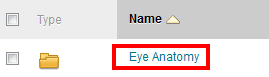
Click on the link to your lesson (see below).
Revise a Lesson after It Has Been Uploaded into Blackboard
If you uploaded a .zip file into Blackboard (rather than using the File/Save to LMS or the File/Publish option), then you'll need to delete the files from the Blackboard Content area, save and re-package your lesson as a .zip file, upload the .zip file and then link to the index.hml file. Please follow the steps below.
- In Blackboard, select your course and navigate to your content area.
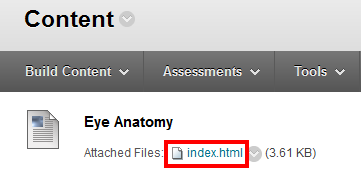
- Once you see your lesson, click the dropdown menu arrow next to it and select Delete (see below).

- Click Ok to confirm the deletion.
- On the left-hand side under Control Panel click Content Collection. (Content Collection might be a tab on the top of the screen). (Or under Control Panel click Files.) To the right of the word Content Collection (or Files), click the arrow (see below).

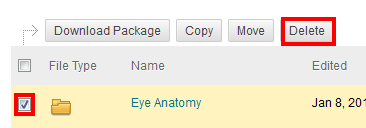
- Select the checkbox beside the folder for your lesson. Then click Delete (see below).
- Start SoftChalk. Make your changes in your SoftChalk lesson and save your lesson.
- Package your lesson as a .zip file (see the section In SoftChalk: Package a Lesson).
- Upload your .zip file again (see the section In Blackboard: Upload a Standard Zip File.)
Link to a Discussion Forum within a Lesson
(The following instructions assume you already have a forum set up under the Discussion Board.)
- IMPORTANT: Log into your Blackboard account as a student (rather than as the instructor).
- At the top of your screen, click the Courses tab.
- Within the Course List, click on your course to select it.
- On the left sidebar, select Tools.
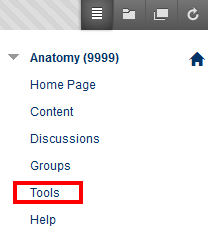
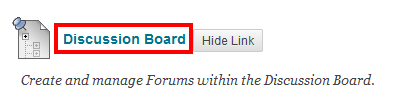
- Within the Tools area, select Discussion Board (see below).
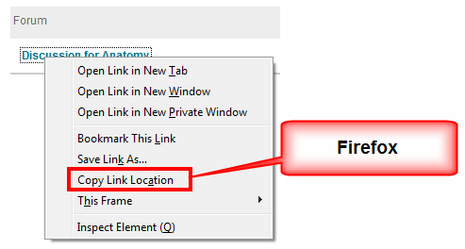
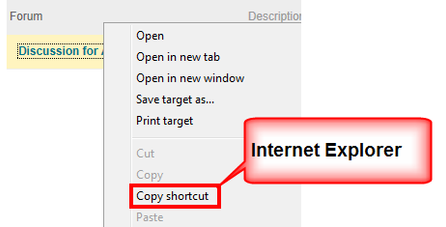
- Right-click on the name of your forum and choose Copy Link Location (Firefox) or Copy shortcut (Internet Explorer) (see below).
- Start SoftChalk and open your lesson.
- Select some text in your lesson.
- Choose Insert/Hyperlink.
- In the URL or Selected file area, use Ctrl+V to paste the link (or right-click and choose Paste.)
- Select Open the link in a new window. Click OK.
- Save your lesson.
IMPORTANT: The link will only work when you're in Blackboard (not if you preview your lesson on your local computer).
If you get an Access Denied Error, then you may have neglected to log in as a student. See step #1 above.
Help
Please visit our SoftChalk Support webpage. For purchase information, please contact sales@softchalk.com.
Copyright Information
Copyright ©2002 2003 2004 2005 2006 2007 2008 2009 2010 2011 2012 2013 2014 2015 2016 2017 2018 2019 2020
SoftChalk LLC
All Rights Reserved.