| Anchor |
|---|
| _Toc182972972 |
|---|
| _Toc182972972 |
|---|
|
| Anchor |
|---|
| _Toc194313865 |
|---|
| _Toc194313865 |
|---|
|
| Anchor |
|---|
| _Toc194314125 |
|---|
| _Toc194314125 |
|---|
|
| Anchor |
|---|
| _Toc194314313 |
|---|
| _Toc194314313 |
|---|
|
| Anchor |
|---|
| _Toc194314388 |
|---|
| _Toc194314388 |
|---|
|
| Anchor |
|---|
| _Toc194314532 |
|---|
| _Toc194314532 |
|---|
|
| Anchor |
|---|
| _Toc194314966 |
|---|
| _Toc194314966 |
|---|
|
 SoftChalk Cloud™ Quick Start Guide
 Updated
December 14January 6,
2022 2023 Contents Introduction Quick Start Guide Web Link Step 1 - Create a SoftChalk Cloud Account Step 2 - Create Your First SoftChalk Lesson Start Create Online Add Content Add a Page Break Save and Preview Your Lesson Choose a Theme, Layout, & Enter a Title Add an Activity Add a Self-Check Question – Example: Multiple Choice Embed a YouTube Video Exit Create Online Step 3 – Edit and Share a SoftChalk Lesson Edit Your Lesson in Create Online Share Your Lesson Link Step 4 - Learning Management System Integration Using SoftChalk Lessons in Your LMS LMS Video and Guide Links Install the SoftChalk Create App Windows Macintosh Other Resources and Guides Help Copyright Information
| Anchor |
|---|
| _Toc191097787 |
|---|
| _Toc191097787 |
|---|
|
| Anchor |
|---|
| _Toc194313866 |
|---|
| _Toc194313866 |
|---|
|
| Anchor |
|---|
| _Toc194314126 |
|---|
| _Toc194314126 |
|---|
|
| Anchor |
|---|
| _Toc194314314 |
|---|
| _Toc194314314 |
|---|
|
| Anchor |
|---|
| _Toc194314389 |
|---|
| _Toc194314389 |
|---|
|
| Anchor |
|---|
| _Toc194314533 |
|---|
| _Toc194314533 |
|---|
|
| Anchor |
|---|
| _Toc194314967 |
|---|
| _Toc194314967 |
|---|
|
| Anchor |
|---|
| _Toc194315567 |
|---|
| _Toc194315567 |
|---|
|
| Anchor |
|---|
| _Toc194315719 |
|---|
| _Toc194315719 |
|---|
|
| Anchor |
|---|
| _Toc194315801 |
|---|
| _Toc194315801 |
|---|
|
| Anchor |
|---|
| _Toc194402943 |
|---|
| _Toc194402943 |
|---|
|
| Anchor |
|---|
| _Toc194403039 |
|---|
| _Toc194403039 |
|---|
|
| Anchor |
|---|
| _Toc323807144 |
|---|
| _Toc323807144 |
|---|
|
| Anchor |
|---|
| _Toc384649504 |
|---|
| _Toc384649504 |
|---|
|
| Anchor |
|---|
| _Toc474161590 |
|---|
| _Toc474161590 |
|---|
|
...
...
IntroductionWelcome! We're excited to help you get started using SoftChalk Cloud! This Quick Start Guide is designed to give you a quick overview of the basics for using SoftChalk Cloud to create your first online lesson.
Just follow our simple 4 step process to create engaging, interactive, media-rich online lessons. Using this guide, you'll learn how to quickly create a lesson in your SoftChalk Cloud account, add interactive games, quizzes, and videos, and then share your lesson with your students.
Of course, that's just the beginning! After learning the basics in this guide, you can get additional info about all the features in SoftChalk Cloud from the "Get Started" page on our website, our Video Tutorials, the SoftChalk Cloud Guide, and the Getting Started section in our SoftChalk Create Guide.
Do you have a question that isn't answered here? Or need additional help to get started? Please visit our SoftChalk Support webpage. For purchase information, please contact sales@softchalk.com.
Let's get started!!
...
...
Quick Start Guide Web LinkThe web link for this guide is below. As we update this guide, the URL will remain the same. (You may want to bookmark this link in your web browser.)
https://softchalk.atlassian.net/wiki/download/attachments/129237016/quickstartguide.pdf
| Anchor |
|---|
| _Toc474161591 |
|---|
| _Toc474161591 |
|---|
|
...
...
Step 1 - Create a SoftChalk Cloud AccountIf you have not already created a SoftChalk Cloud account, please use the steps below to create an account.
IMPORTANT: If your institution has an Enterprise SoftChalk Cloud, you will need a different SoftChalk Cloud URL and may need different steps to create a SoftChalk Cloud account - please consult your institution's technical support.
...
- If you are creating a "Free Trial" account, please complete the online request form. You will receive an activation key via email.
- If you are creating a licensed account, you will receive an activation key from SoftChalk, or from your school/institution liaison.
...
- Fill in the rest of your profile, select the two checkboxes at the bottom and click Join. Congratulations, you now have a SoftChalk Cloud account!
| Anchor |
|---|
| _Toc474161595 |
|---|
| _Toc474161595 |
|---|
|
...
...
Step 2 - Create Your First SoftChalk LessonBelow are instructions on creating a simple three page lesson with a feedback question, an activity, and an embedded YouTube video.
| Anchor |
|---|
| _Toc474161596 |
|---|
| _Toc474161596 |
|---|
|
...
...
Start Create Online- Login to SoftChalk Cloud with your username and password
- From the SoftChalk Cloud menus, choose My Content and then Lessons to display the Lessons Folder view. From the Actions menu, choose Create Lesson in Create Online.
...
- This will open Create Online, and you will be ready to start creating a SoftChalk lesson.
...
...
Add Content- SoftChalk Create Online works like a word processing program. Simply type your lesson information into the text area of SoftChalk Create Online You may also copy and paste text into the text area from a Microsoft Word document or other source.
- Use the toolbar to apply formatting (bold, italic, headings) and insert bullets, tables, weblinks, images, etc. Each of these features work in a similar way to standard word processing programs.
| Anchor |
|---|
| _Toc474161599 |
|---|
| _Toc474161599 |
|---|
|
...
...
Add a Page BreakIf you have a lot of content in your lesson, you may want to insert page breaks to "chunk" your content into multiple pages (rather than delivering all of your content in a single lesson page).
- In the main editing window, place your cursor in the text where you'd like the page to break, then hit your Enter or Return key to create a new paragraph.
- Go to the Toolbar and click the Page Break icon
 .
.

...
...
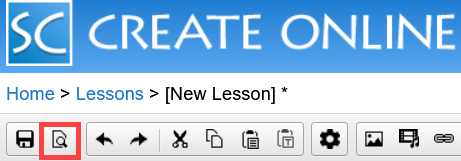
Save and Preview Your Lesson- To view the lesson the way a student will see it:
- Name your lesson by typing into the dialog at the top of the editing window:
...
Your lesson will open in a new tab or a new window in your browser. Note that your lesson editing session will remain open as well. Once you've previewed your lesson, you can close the preview window and continue editing your lesson.
It's good practice to preview your lesson often, as you are adding and editing content, or modifying your lesson properties.
NOTE: SoftChalk lessons are web pages that contain standard HTML, CSS, JavaScript, images, and media. Students will view your lessons using any standard web browser.
| Anchor |
|---|
| _Toc474161597 |
|---|
| _Toc474161597 |
|---|
|
...
...
Choose a Theme, Layout, & Enter a TitleWhen you first create a lesson, it has a default Theme and Layout. It's easy to change the look-and-feel of your lesson – simply select a different "Theme" or "Layout".
...
- Additionally, you may also enter a Lesson Title and Subtitle, choose a Layout, and make other selections by clicking the Properties icon on the toolbar and making selections for Title & Layout, Overview Page, and Sidebar.
- Once you have made your selections, you will be returned to the main editing window.
- To view the changes and see your lesson the way a student will see it, save your lesson, and click the Preview button on the toolbar.
...
| Anchor |
|---|
| _Toc474161600 |
|---|
| _Toc474161600 |
|---|
|
| Anchor |
|---|
| _Toc474161598 |
|---|
| _Toc474161598 |
|---|
|
| Anchor |
|---|
| _Toc123906735 |
|---|
| _Toc123906735 |
|---|
|
Add an Activity Activities are great way to include formative assessment and feedback for your student. Some activities can be scored, like a quiz question. Other activities are "information presentation" style activities.
...
- Continue creating as many cards as needed for your activity.
- When you have completed creating cards, enter the Max Points for your activity.
- Click the OK button at the top of the activity editor dialog to save your activity. It will be embedded or linked into your lesson page.
- Back in the main editing window, you will see a 'placeholder' image that represents the location of the activity in your lesson page. If you need to make changes to the activity, you can right-click on the placeholder image, then choose Modify Activity to reopen the activity for editing.
- To view the activity in your lesson the way a student will see it, save your lesson, and click the Preview button on the toolbar.
- In the main editing window, hit your Enter or Return key to create a new paragraph after the activity and continue adding additional content to your lesson.
...
...
Add a Self-Check Question – Example: Multiple ChoiceAdding self-check quiz questions to your lesson is a great way to include formative assessment and student feedback into your lesson. You can insert individual quiz questions anywhere in your lesson to provide your students a way to self-check their understanding of concepts as they progress thru the lesson.
...
- Click the Display tab at the top. Notice you have three options for how the question will be viewed by the student. The default is Embed in lesson page. Click OK to save your quiz question into your lesson.
- Back in the main editing window, you will see a 'placeholder' image that represents the location of the quizpopper in your lesson page If you need to make changes to the activity, you can right-click on the placeholder image and choose the edit option. The quizpopper editor will reopen for editing.
- To view the quiz in your lesson the way a student will see it, save your lesson and click the Preview button on the toolbar.
- In the main editing window, hit your Enter or Return key to create a new paragraph after the activity and continue adding additional content to your lesson.
| Anchor |
|---|
| _Embed_a_YouTube |
|---|
| _Embed_a_YouTube |
|---|
|
| Anchor |
|---|
| _Toc474161601 |
|---|
| _Toc474161601 |
|---|
|
...
...
Embed a YouTube VideoYou can add videos into your lesson from any source. Videos can be linked or embedded into the lesson page. Below is an example for embedding a YouTube video.
...
- To view the video in your lesson the way a student will see it, save your lesson, and click the Preview button on the toolbar.
- In the main editing window, hit your Enter or Return key to create a new paragraph after the video and continue adding additional content to your lesson.
...
...
Exit Create OnlineWhen you have finished editing your lesson, you can exit Create Online by clicking on either the Home link or the Folder link at the top of the Create Online window.
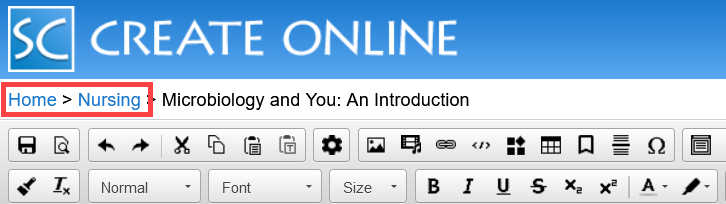
- Click the Home link to exit and return to the SoftChalk Cloud Home page.
- Click the Folder Name (e.g., Nursing) to exit and return to the lesson list page
...
...
Step 3 – Edit and Share a SoftChalk LessonOnce you've saved and exited your lesson editing session, you can perform several actions on your lesson – preview the lesson, edit the lesson, and access the lesson link information to put into your learning management system. These actions are described below.
...
...
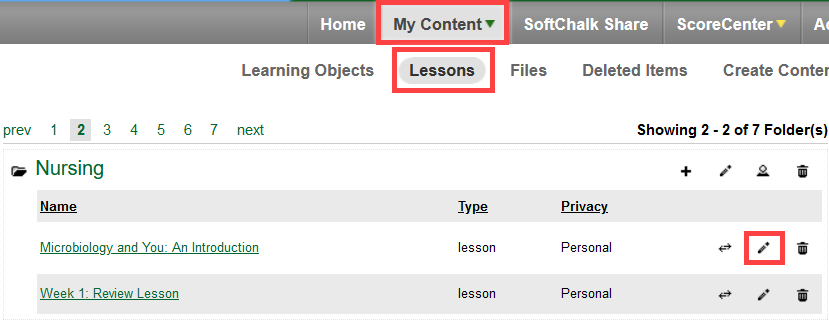
Edit Your Lesson in Create Online- Select My Content / Lessons. This will display the lesson list page. This view shows your Lessons folder and the lesson(s) you have created in that folder. Note: If you have multiple folders of lessons, navigate the folders to find the lesson you wish to access.
- Click on the pencil icon to the right of the lesson title to open the lesson for editing in Create Online.
...
...
Share Your Lesson LinkEach lesson you create in SoftChalk Cloud has its own unique web link (URL). You can provide this web link if you wish students or colleagues to view your lesson.
...
- From the lesson details page, scroll down to the Lesson Actions area. At the bottom right, right-click within the Hyperlink field and choose Copy to grab a copy of the lesson link.
- Lesson links can be put into other web pages, into an email, into a Google Doc or PDF file.
- A major advantage of using SoftChalk Cloud is that you can put your lesson links into multiple places (multiple web pages, emails, etc.) and when you need to update the lesson information, you can update it one time in SoftChalk Cloud, and every place you have linked to the lesson will be simultaneously updated.
- From the lesson detail page, you can perform several actions
- preview the lesson The lesson is embedded in this page for quick previewing. You can also preview the lesson full screen (the link is near the top of the page)
- edit the lesson In the Lesson Actions area on the right, there are two options for editing your lesson: Edit in Create and Edit in Create Online. To edit using the editor described in this guide, choose the option for Edit in Create Online. This will launch the editor and open your lesson for editing. There are some differences between the two editing options; here are some considerations:
- You may edit the lessons you create with either editor. Lessons created with one editor can be edited with either editor.
- The option Edit in Create will launch the SoftChalk Create app for you to edit your lesson. NOTE: Before using the Create app to edit content, you must install the app. The instructions for installing the Create app are provided at the end of this Guide. For more information about using the Create app, please see the SoftChalk Create Guide.
- The Create Online Editor does not require the installation of an app. You can use the Create Online Editor with any major web browser (Chrome, Firefox, Safari, Edge), which means you can create and edit content from any device (computer, laptop, tablet, mobile) that supports these browsers.
- The Create app has more features than Create Online – including the ThemeBuilder and Media Search too. Stay tuned, the plan is to have all features available in both editors – we're working on it!
...
...
Step 4 - Learning Management System Integration...
...
Using SoftChalk Lessons in Your LMS
SoftChalk lessons work with most any learning management system, i.e., Canvas, Blackboard, Moodle, BrightSpace, Schoology, etc. Every LMS is different, so the specific steps for integrating SoftChalk lessons will depend on which LMS you are using. See the table below in this section for details.
Each lesson you create in SoftChalk Cloud can be added to your learning management system (LMS) course. There are several options including:
...
A key advantage to using SoftChalk Cloud with your LMS is that you can link each lesson into multiple courses in your LMS. Should you need to update your lesson, you update it one time in SoftChalk Cloud – and every course that links to that lesson will be immediately and simultaneously updated. It's a very efficient way to manage your LMS course content.
If needed, you can also link your SoftChalk lesson(s) into multiple courses in different LMS platforms simultaneously. This is particularly helpful if you are transitioning from one LMS to another.
...
...
LMS Video and Guide LinksThe table below provides links to videos and guides that provide more detailed information about SoftChalk Cloud content integration with various learning management systems. If you don't see information for your LMS, please email help@softchalk.com to inquire for information. SoftChalk works with most any LMS and we will do our best to help you deliver your SoftChalk content where you need it!
| Anchor |
|---|
| _Toc474161592 |
|---|
| _Toc474161592 |
|---|
|
...
...
Install the SoftChalk Create AppAs discussed in a previous section of this guide, SoftChalk Cloud offers two different methods for creating and editing lessons – Create Online (the method discussed in this guide), and the Create App.
Create Online does not require you to install any software on your computer – it runs in your web browser. The SoftChalk Create App requires a software installation. Follow the instructions below to install the Create App on your Windows or Macintosh computer.
Even if you are not an administrator on your computer, you should be able to install the SoftChalk Create App. If you have any questions about computer requirements, please see our System Specifications page. If you run into any issues with your installation, please see our FAQs.
If you have a Macintosh, please see the section Macintosh on the next page.
| Anchor |
|---|
| _Toc474161593 |
|---|
| _Toc474161593 |
|---|
|
...
...
Windows- Download and install the SoftChalk Create App (windows version).
- Please be patient while the installer downloads - it typically takes one to five minutes.
- Open the folder where you saved your installer file. Typically, this folder is called Downloads on a Windows computer. The installer file is called SoftChalk-Create-Cloud-11.exe when downloading 32-bit or SoftChalk-Create-Cloud-11-64bit.exe when downloading 64-bit Windows installer. Double-click on this file to run the installation.
- Congratulations! You have installed the Create App successfully on your computer.
| Anchor |
|---|
| _Toc474161594 |
|---|
| _Toc474161594 |
|---|
|
| Anchor |
|---|
| _Toc513034039 |
|---|
| _Toc513034039 |
|---|
|
...
...
Macintosh- Download and install the SoftChalk Create App (Macintosh version).
- Please be patient while the installer downloads - it typically takes one to five minutes.
- Once the installer has downloaded, Click Open.
...
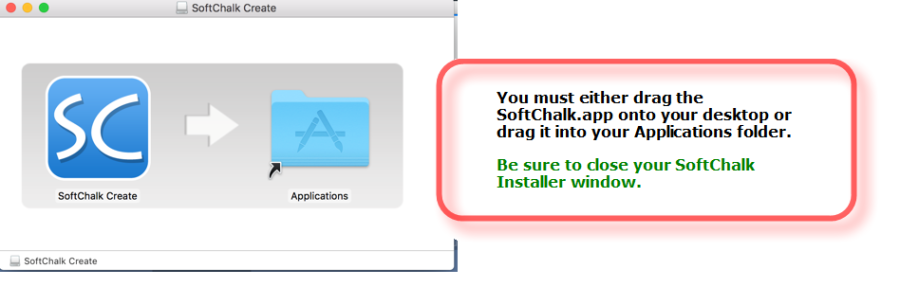
- When you click on "Agree" to agree to the license, you'll see the contents of the disk image for the installer. IMPORTANT: To complete the installation, either drag the SoftChalk.app onto your desktop or drag it into your Applications folder. Be sure to close your SoftChalk Installer window.
- Congratulations! You have installed the Create App successfully on your computer.
| Anchor |
|---|
| _Learning_Management_Systems_2 |
|---|
| _Learning_Management_Systems_2 |
|---|
|
For information about using the Create app, or for additional resources and guides, please see the next section
Other Resources and Guides.
| Anchor |
|---|
| _Other_Resources_and |
|---|
| _Other_Resources_and |
|---|
|
| Anchor |
|---|
| _Toc474161609 |
|---|
| _Toc474161609 |
|---|
|
...
...
Other Resources and GuidesResource | Description |
Sample Lessons | View sample lessons created by SoftChalk customers. |
Video Tutorials | The videos are typically 2-5 minutes long and cover Getting Started with SoftChalk Cloud as well as saving a lesson to SoftChalk Cloud, using images in SoftChalk, and creating quizzes and activities. |
SoftChalk Webinars | Sign up for free SoftChalk webinars including Introductory Webinars for getting started with SoftChalk Cloud. |
SoftChalk Cloud Guide | Contains info on how to create a Cloud account, collaborate on lessons with other instructors, share content and find content to use in our SoftChalk Share repository. |
SoftChalk Create Guide | Gives details on using the SoftChalk Create app, our award-winning content authoring software. SoftChalk Create is a feature within your SoftChalk Cloud account. |
Student Guide to SoftChalk Lessons | Contains info for students taking SoftChalk lessons. Includes a Troubleshooting section. |
Migration to SoftChalk Cloud | If you are already familiar with the desktop version of SoftChalk Create and want to start using SoftChalk Cloud, this is the guide for you. |
System Specifications | Gives the system specifications for both instructors who are creating content (e.g. SoftChalk lessons) and students who are viewing SoftChalk lessons in web browsers. |
FAQs | Frequently Asked Questions |
| Anchor |
|---|
| _Toc391487577 |
|---|
| _Toc391487577 |
|---|
|
...
...
...
...
...
...
HelpPlease visit our SoftChalk Support webpage. For purchase information, please contact sales@softchalk.com.
...
...
Copyright InformationSoftChalk Cloud Quick Start Guide
Copyright 2017 - 2022 SoftChalk LLC
All Rights Reserved